Showing posts with label Tips. Show all posts

Wednesday, July 9, 2014

I Mash In My Sleep: Overnight Mashing


I'm all about cutting time out of the brewday for other, more important things like family.  One thing I have done to facilitate this is brewing multiple batches from one mash.  The other is to mash-in the night before I brew, go to sleep, then sparge and bring to a boil in the morning when the boys wake me up.

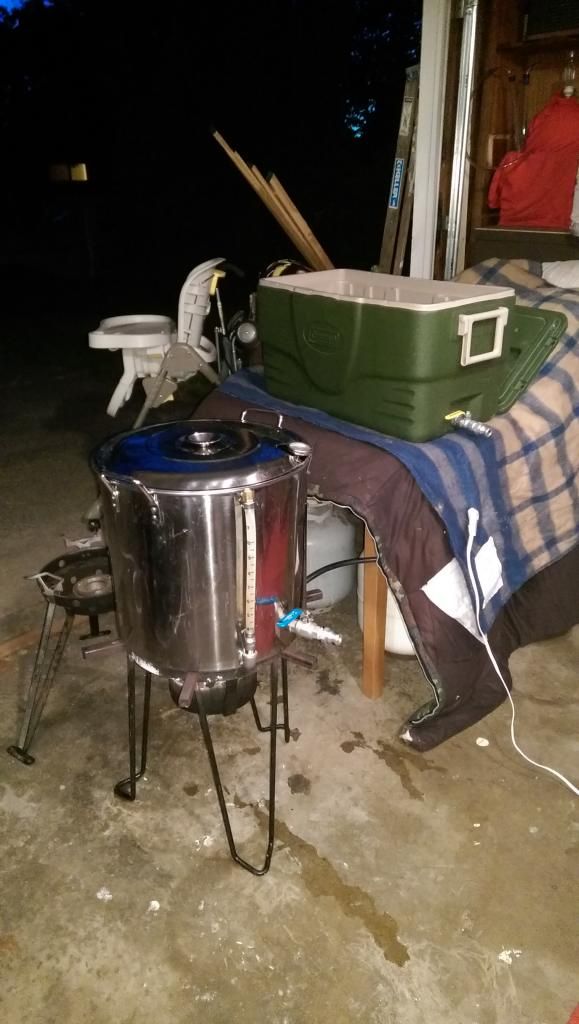
I use a cooler for my mash. I mash a fewer degrees higher than I normally would, and keep a normal pH.   Basically I follow my standard All-Grain mash with batch sparge, except I go to sleep for the night during the mash itself.  After doughing in, I wrap the cooler in an electric blanket, and then also wrap it in a sleeping bag. I lose about 1*F per hour, and usually mash 9-10 hours total.  I also mash for 10 gallon batches to get my MLT near maxed out to improve heat losses.

Thursday, September 19, 2013

Technique: Packaging Hops

Lupulin On Hands From Pushing Through Funnel
Previously I posted about how to build an oast for drying hops.  Once you have your hops dried, it is necessary to package them for future use.  In the days before refrigeration, hops would be stored in the open, and would degrade quickly.  Many places, including home brew shops and breweries, keep there hops in large tight packed bails which they get them from hop growers in.  As needed they will break off chunks to brew with, or in the case of home brew shops, to package.  While not in use, these hops are stored in freezers, but still open to atmospheric oxygen, which causes hops to degrade.  In a brewery situation this is not as bad as hops are used up quicker.  In a home brew shop they move much slower and therefore begin to oxidize.  Pellet hops are easier as they come in 11# vacuum sealed mylar packaging and you can go through 11# in a brew house much quicker.

The best way to keep hops at there freshest is to flush them with inert gas like nitrogen, and vacuum package them in mylar bags that are then stored cold.  Of course, for homebrewers, this is a bit excessive.  For us, the best option is to vacuum seal them and store them cold, the colder the better.  Some people try to cram as much into a vacuum seal bag as possible, packaging them in 1# blocks.  This at first seems like a great idea, but as I thought about it more, I changed the way I packaged hops.  I was influenced by Matt Brynildson from Fierstone Walker Brewing, and a local brew-farm.  Matt talked about how Chinook taken out of the package and left exposed to oxygen in a refridgerator awaiting the late boil additions goes from pine bomb and wonderfully fruity to cat pee in a very short time.  Our brew club also had the hop guy come talk last month from a local brew-farm.  They grow their own hops, chiles, spices, and even some grains for use in their beers.  He was talking about how they have started packaging their hops in recipe quantities.  So if they know their recipe uses a total of 3# of Cascade in the boil, they package as many 3# Cascades as they need for the year.

Monday, August 12, 2013

Raise, Rain, Rouse, Rest, Recirculate, Runoff, Rinse, Repeat: Mashing and Batch Sparge.

It wasn't long before I made the move to All Grain brewing once I started making my own beer.  4 batches to be exact.  All Grain brewing allows you to control certain variables in the process such as fermentability of your wort (bone dry finish, dry finish, sweet finish) as well as the body of the beer (light, medium, full, chewy).  When using malt extract, these variables are set by the company making the extract, as well as the composition of the base wort (some use caramel malts or carapils in the grist along with base malt).  All Grain brewing also allows you to use malts that cannot be used with out mashing like Munich and Vienna base malts, raw grains (raw wheat, raw oats, flaked adjuncts, etc.), and others.  It is also more affordable (initial investment is more, but cost of grains is drastically cheaper).  Many brewers might fear that All Grain brewing is too difficult, but in reality it is fairly simple: RAISE a volume of water to a given temperature, RAIN it into your mash tun, ROUSE the grains into the water, REST the mash, RECIRCULATE the liquid then RUNOFF the liquid, RINSE the grains, REPEAT the process (see below for the specifics).  

Thursday, March 14, 2013

Increased Output: Multiple Beers With Minimal Effort

I learned early on that I needed to find a way to brew more beer without taking away more time from my family and ministry.  Although this seems impossible, I found a trick that has allowed me to double my output while keeping my brew schedule light.  I began doing this in my 5th month of brewing and have used it a lot ever since.  Basically, make one beer into 2 (or more).  There are a couple options for doing this, some require a little more time and effort, others are no more difficult than making a single 10 gallon batch.

Thursday, February 14, 2013

CO2 Forced Racking

Oxygen impacts both the flavor and stability of beer in many ways.  Small amounts of oxygen over extended periods of aging in big beers can impart lovely Sherry and dark fruit notes in beers like Barley Wines, Dopplebocks, and Scotch Ales, while Imperial Stouts can take on the flavor and aroma of soy sauce.   Small amounts of oxygen in sours can lead to the growth of acetic acid bacteria, while too much oxygen will turn the beer to vinegar.  If you've ever had a gathering at your home that included beer consumption and left the mess for the next morning, you know the smell of oxidized beer, a beer that has been exposed to way too much oxygen, the smell of wet cardboard.  Aside from aroma and flavor degridation, too much oxygen in the brewing process can lead to an unstable product that might taste good (not great) fresh, but quickly decline after packaging.  One of the fastest beers to decline from too much oxygen is an IPA; known for it's beautiful aromatics, oxygen exposure with hops make them dull quickly, this is the reason why so many homebrewers want kegs for at least their IPAs.

Monday, October 24, 2011

Efficiency Experiment: The Results Show

As planned, I did my efficiency experiment this past weekend and I think I found my culprits. I double milled my malts to ensure a good crush. I mashed with 1.5 qts/lb. I ran off my first runnings and measured them so I could hit my sparge water volume perfectly. I got my pre-boil volume perfect. I boiled for an hour, and added hops on schedule and lost exactly 1 gallon to boil off which is what I wanted. I hit 80% efficiency (measured pre and post boil).

When I went to fill the conical... not even enough volume to register on my measurements (which start at 4.5 gallons.) I topped it up with a measured 1 gallon of water to see where I was at, and hit 5 gallons on the nose. I lost 1.5 gallons of wort to my hops and kettle! I had been chatting with Denny Conn about my issues as well and he said that he figures about 12oz of beer lost to 1oz of hops. I had 7.5 oz of hops (5.5 whole, 2 pellet) and that would give me roughly 3/4 of a gallon lost to hops, and 3/4 gal lost to keggle pick up tube. That brought my efficiency down to 60%.

Friday, October 21, 2011

Efficiency Experiment

As stated in a previous post, my efficiency on my last batch was shotty. I took a look at all 11 of my all grain brews and the efficiencies I've had, and they are always jumping. My first batch, a Black IPA, I got 66% from 13# of grain, using US Pale base malt. The second, an English Bitter, I got 83% from 8# of grain, Marris Otter base. The third and fourth, both Wheat beers, I got 76% from 19#, on a split batch, 65% Wheat, 35% Pils, batch 5 was a sour of the remaining wort from that mash, in which I hit (I assume) about 78%. Batch 6, a Saison, was 70% from 9.75#, Pils base. Batch 7, same day, a second Saison, 76% from 8.25#, Pils base & 25% Rye. Batch 8, a Mild, 72% from 8#, Munich I & Victory base. Batch 9, a Lambic, 75% from 11.5#, Pils, Vienna, and Wheat. Batch 10, same day, a Fresh Hop IPA, 68% from 13.5#, US Pale base malt. Batch 11, a Brown, 62% from 14.5#, US 2Row base. As you can see, there isn't any real consistency in my efficiency, so I decided I need to actually get the process refined and find my efficiency. I will be conducting an experiment to find out my volume losses and efficiency.