
Oxygen impacts both the flavor and stability of beer in many ways. Small amounts of oxygen over extended periods of aging in big beers can impart lovely Sherry and dark fruit notes in beers like Barley Wines, Dopplebocks, and Scotch Ales, while Imperial Stouts can take on the flavor and aroma of soy sauce. Small amounts of oxygen in sours can lead to the growth of acetic acid bacteria, while too much oxygen will turn the beer to vinegar. If you've ever had a gathering at your home that included beer consumption and left the mess for the next morning, you know the smell of oxidized beer, a beer that has been exposed to way too much oxygen, the smell of wet cardboard. Aside from aroma and flavor degridation, too much oxygen in the brewing process can lead to an unstable product that might taste good (not great) fresh, but quickly decline after packaging. One of the fastest beers to decline from too much oxygen is an IPA; known for it's beautiful aromatics, oxygen exposure with hops make them dull quickly, this is the reason why so many homebrewers want kegs for at least their IPAs.
But simply packaging a beer in a CO2 purged keg doesn't take out all the possibilities of oxygen exposure. When ever I take a sample from a beer in primary, I expose it to oxygen, which is usually forced out by the still escaping CO2, but it is still exposed none the less. Next when I move my beer out of my fermenting fridge to a raised location (counter, table, etc) so I can rack it via gravity and siphon, the airlock will bubble back oxygen through the liquid and slosh it around into the beer as I walk. Then I remove the airlock and bung exposing it to more oxygen during racking; the beer is transferred into an air filled bottling bucket and air is sucked into the carboy as volume is displaced through the siphon. For some reason the tubing doesn't fit snug on my auto siphon and it lets in oxygen where they attach. Next I put it into oxygen filled bottles to carbonate and store. Each step leads to a product that is just not at its prime.
What ever will I do? I will use the newly acquired CO2 tank and regulator I bought used on a well known used stuffs website. Even though I don't have kegs (yet) I can still stave off the oxygen in my brewing post fermentation. First, I can displace the oxygen I let into the carboy during sampling by forcing some of the CO2 into the head space. I can also flush the bottling bucket and/or secondary fermenter with CO2. I can flush each bottle with CO2 prior to filling.
One of the great advantages is that I will no longer have to move my beers after fermenting, prior to racking, sucking in oxygen and sloshing it around in my beer. With a racking cane, a carboy cap, and a small adapter piece for the CO2, I can run CO2 into my fermenter, thus forcing the beer out through the racking cane, into a purged vessel. I got much of my info from a few other sites, such as the Maltose Falcons.
Parts:
CO2 tank
Regulator
Gas Line
Gas 5/16" Barb Swivel nut
1/4"-5/8" Hose Clamps (4)
1/4" Barb to 1/4" Flare Male Thread
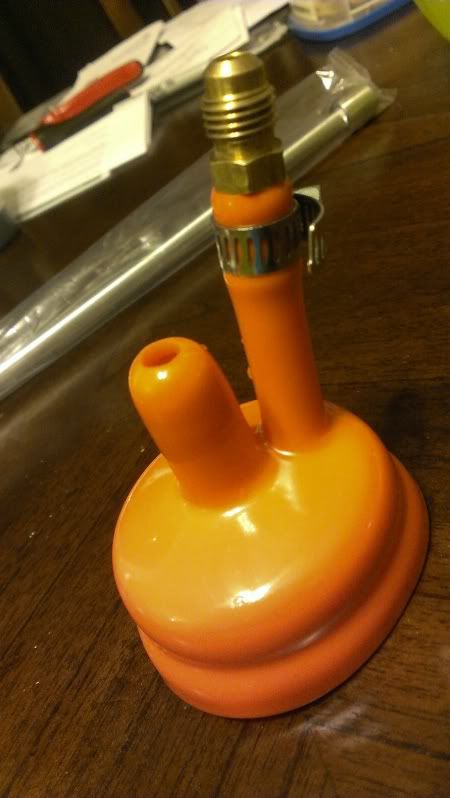
Carboy Cap (fit to your size vessel)
Stainless Steel Racking Cane
Transfer tubing (enough length to go from racking cane to bottom of vessel, have 5 feet)
Once you have your CO2 tank and regulator put together, and have attached your length of gas line to it, you will attach the 1/4" barb to swivel to the end of the gas line, and apply a hose clamp. This will allow you to attach it to the flare or to a quick disconnect gas fitting for a keg.

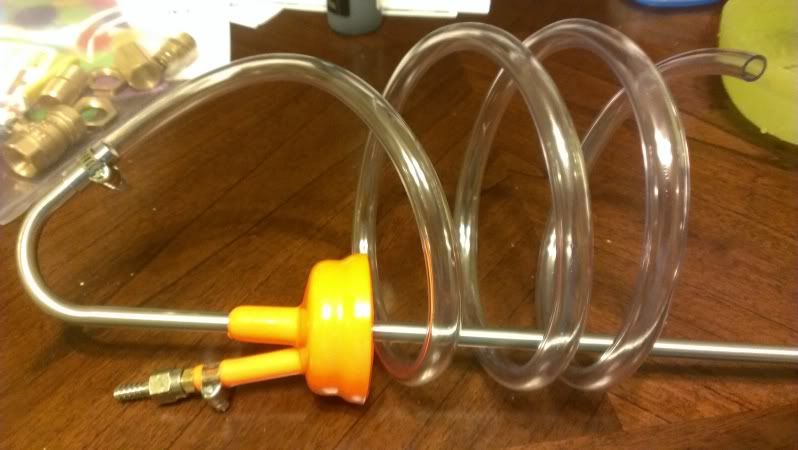
Sanitize the entire set up. I use a Wall Paper Tray filled with one gallon of StarSan, and submerge the entire thing, making sure to get the sanitizer through the cane and tubing especially, since these will actually be in contact with the beer. Next, flush the sanitized vessel with CO2 (you could put the sanitizer into the container and use this method to force the liquid out thus flushing and sanitizing). Remove the bung and airlock from your fermenter, and flush with CO2. Fit the carboy cap atop the carboy leaving the bottom of the cane above the level of yeast, trub, hops, etc, and put the end of the tubing into the receiving vessel.
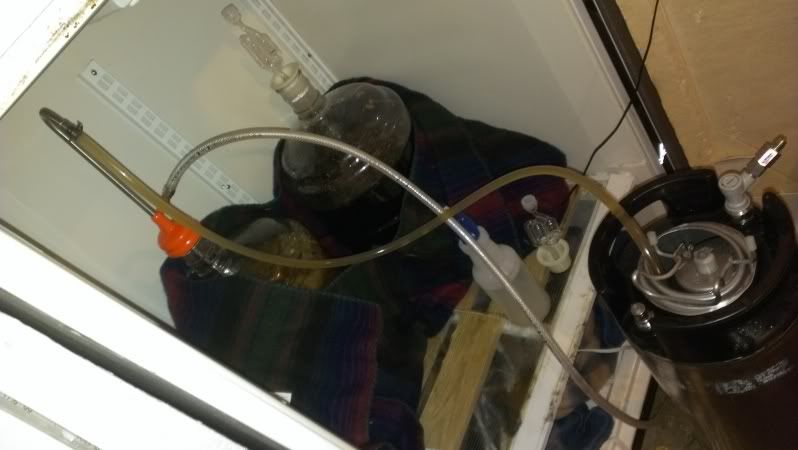
Attach the gas line to the flare fitting using the swivel nut. After ensuring that the gas tank is on, open the diaphragm on your regulator to 3 psi (never go above 5 psi since this could explode your carboy). The beer should begin moving up through the cane and the tubing into the receiving vessel as the CO2 forces it out and displaces the lost volume. The pressure build up may cause the carboy cap to pop off - loudly! - just affix it again and continue. Do not try to clamp the carboy cap onto the carboy as this will keep the carboy cap from popping off if the pressure builds too high or the cane gets clogged, which will cause the carboy to explode.
After the beer is transferred allow the gas to push through the line some and bubble up inside the receiveing vessel through the beer to displace any oxygen in the vessel with CO2. Remove the tubing from the newly filled container of beer, closing off the vessel with a bung and airlock, and turn off your CO2, and detach the line from the flare fitting. Now you can move the freshly emptied carboy, and clean it all as you normally would. If you used this method to rack to a secondary for dry hopping, fruiting, or bulk aging, you can use this method to move it again to packaging when ready (transfer to flushed bottling bucket, keg, cask). Once it is packaged and carbonated, enjoy a great, fresh beer as free from oxygen as you can get it.
This is a great write up thanks for all the info. What kind of carboys do you use?
ReplyDeleteI use PET bottles like Better Bottles and Vintener's Classic.
ReplyDelete