Wednesday, January 30, 2013

More Gushing!

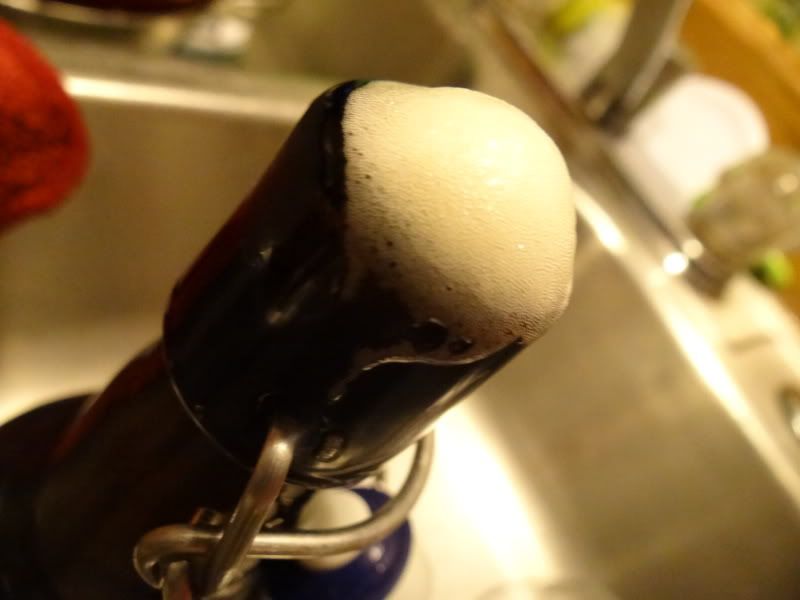
After all the gushing that I suffered last year at this time, which I thought I had tracked down to the used plastic conical I purchased, I fear that it may have a new infected batch.  My second runnings beer is quite phenolic and tart, and it gushes when opened.  I have some bottles in the fridge and some stored in the garage.  Fridge is holding at 35*F, garage is floating in the 40s.  The garage bottle gushed out for over an hour, slowly.  The fridge bottle foamed up quite a bit up to the lip but never gushed over the edge.  I repitched the yeast from my Fresh Hop Brown Ale for this batch, as well as my Wee Heavy that this beer came from.  The Wee Heavy doesn't seem to be showing any off flavors or over carbonating, but it was in the secondary for a month longer than this one.  Also, the Brown Ale is great, even after 4 months, no phenols, no tartness, no carbonation issues, so I am not sure what is happening with this new batch of gushers.  

I did ferment it with oak which might have introduced something wild during the longer than expected lag phase.  

Another possibility could be that since almost all of this batch was bottled in used swing tops that maybe the rubber grommets on the bottles had wild yeast on them from previous beers (a few of my sour Wits and Saisons, as well as last year's infected beers).  I will be replacing all my grommets, boiling them before every new batch. 

Now that I think about it, I did ferment this beer in a 5 gallon glass carboy, which I had my Lambic in for over a month prior to bottling to get it off the oak.  With the lag phase, and the possibility of having some of those bugs in there, it's possible that this is the cause (I have since sold my 5 gallon glass carboys and switched to plastic).

No matter what caused it, I pray that I don't end up with the same issues as last year.  Good thing I dumped the yeast after that batch and went with a brand new package of West Yorkshire on my IPA.  I am getting a new SS racking cane and new tubing to replace my auto-siphon (which forced too much air into the beer before all this happened), and using my new CO2 tank to force transfer from here on out which should keep the infection from spreading to any new batches.

Thursday, January 24, 2013

Review: Let's Partigyle

***EDIT: this beer is infected and gushing***

There is just something I don't seem to care for in a second runnings beer.  So far they seem to be insipid and floppy in the malt and body character.  I think the next time I do a partigyle my small beer is going to be an American hop bomb since the malt should play a very minimal role to showcase the hops.  Until then, I guess I'll keep drinking this every so often.

Look:
Pours a hazy bronze, perfect color, but needs to be clear.  Dense rocky tan head that persists leaving great lacing.

Aroma
Smells of spicy and herbal hops, earthy dusting, vineous (from the oak?), touch of biscuit, light citrus fruit.

Flavor
Taste is much like the nose, spicy hops, oak, earthy hops, tannins, toasty malt, very light malt flavor.

Mouthfeel
Somewhat watery, tannic, bitter finish sneaks in and cleans the palate, light carbonation.

Overall
High English hop notes, light malt character, and fermented oakiness.  3 things I don't particularly care for all rolled into one makes for a beer I am not too keen on.  The dry hopping started out as very grassy but faded out for a decent bouquet if you like the spicy/earthy English varieties.  I have done one other oak in primary beer and got the same kind of flavors as I find here and I wasn't too pleased with that one either.  The last time I did a second runnings beer I didn't enjoy the finished product, mostly because they both needed a great malt profile but were lacking with a watery finish.

Tuesday, January 22, 2013

March Pump in Tool Box Build

This year for Christmas my Dad bought me a single present, the March Pump I had been wanting for quite a while now.  Since I don't have a brew stand and have to tear down and move my brew house after every brewday the best option for my needs is to build it into a tool box.  I happened to have a tool box fit for the job as well.  I looked at the BYO article for the build as well as a few others and made a couple tweeks.  One tweek I added is to include an outlet along with the switch so that I can plug in other electrical equipment when needed like my aquarium pump for aerating my wort pre-fermentation.  I also went with a flat light switch instead of the standard one that sticks out away from the surface, this will keep me from possibly catching something on it and accidentally turning it on while dry.

Thursday, January 17, 2013

Final Update: Sour Blondes

Almost a year ago I brewed a double batch of Blonde Ale to test my fermenters to insure that I had rid myself of the infection that had hit my brewhouse.  After finding that one fermenter was clean and the other was actually the original source of my infections, I decided to sour all but 18 12oz bottles of the whole 9 gallons.  As time passed I wanted to take the 2 batches of soured Blonde in 2 different directions.  One received Mangoes, the other got fresh Blackberries from the backyard.  It is nearly time to bottle them as they have developed quite nicely.  The Mango version has a subtle tropical fruit note that I wanted to play up so I decided to dry hop this version.  It received 2oz of Falconer's Flight blend (lots of pineapple), 0.5oz Calypso (apple and pear) and 1oz of Galaxy (citrus and big passion fruit).  My hope is to play up much of the tropical and fruity aspects of this beer and make it a hop lover's dream.  For the Blackberry version there is a light jammy taste which is what I wanted, and I added more French Oak for the last week to give it a little more punch and separate it from the Mango a bit more since that version has no noticable oak at all, and I think it would play nicely with the Blackberry.

Monday, January 14, 2013

New Brewhouse Additions

This year for my birthday and Christmas I was given a chance to expand my brewery equipment and make for a much easier brewday as well.

For my birthday I was able to purchase some aluminum cam lock fittings for the new tubing I am going to be using.  I shopped around and looked at the brass and Stainless Steel quick disconnects which are way too expensive, and I also looked at the SnapLocks from Williams Brewing, which looked great and were affordable, but I faced the issue of having to order, pay shipping and handling charges, and await delivery if I needed to replace an existing piece or expand my usage at all.  I found that A1 Coupling, a local store, carries ½” aluminum cam locks for just about the same price as Williams and I can buy them in town without shipping costs and times.  The aluminum may not look as nice as the SS, but they will work just as well.

I did end up doing an order from Williams Brewing for some other items though.  I bought their silicone washers to replace the washers in the cam locks since the silicone is rated for boiling temps and is food grade.  I also bought 10’ of their ½” thick wall thermoplastic tubing.  I can get silicone tubing here in town at the local brewshop, but it is outrageously priced and using hose clamps on silicone will destroy it.  The thermoplastic is stronger than silicone, cheaper than silicone, and works great with boiling temps, the only draw backs are that I can’t get it locally when I need it, and it is opaque making it impossible to see the liquid flowing through it.  I know another brewer who uses the same tubing in his brewhouse without issues, so I am fairly confident that it will work great for my purposes.

I also ordered a kettle thermometer from them as well (a Christmas present from my wife).  This is going to be a huge help on brewday.  Up until this point I have been dangling a probe thermometer inside my keggle from a piece of copper wire to monitor my temperature during chilling.  The huge problem with this is that I have to take the lid off of my kettle to check on my temperature which opens it up to airborne contaminants or to debris and bugs falling in.  With the new thermometer installed in the side of the keggle I can monitor the temperature of the wort from the outside, and with the new lid I have with a built in notch for my chiller I can keep the lid on from Knock Out to run off keeping the wort free from any outside contaminants.  Along with my new glass lab thermometer that will allow me to calibrate all my thermometers, I should be in good shape for great temperature measurements and more control in my temps.

Speaking of efficient chilling and a notch in my lid for my chiller, I was able to take advantage of one of More Beer’s Deal of the Day items.  I had been planning on building a new wort chiller from 50’ of ½” copper tubing to replace my very ghetto 20’ – 3/8” one I built 2 years ago.  The cost of all the parts was going to be about $100, plus the labor to bend and twist all the pieces, as well as soldering, which I don’t know how to do, and hoping it looked attractive.  When More Beer had that exact chiller, professionally built, for a few dollars cheaper than the cost of the parts to build one, my wife was very gracious and gave me a “Great Daddy and Husband” present, and bought the last one.  I added to this a 2’ length of ½” copper tubing with a J like curve at the bottom as well as a bend at the top for a whirlpool arm like Jamil’s.  I attached a compression to ½” FPT fitting to it that allows me to connect my male cam lock fitting.


At this point, many of you may be thinking, why would I need cam lock fittings with silicone washers, thermoplastic tubing, and a whirlpool arm attachment?  This brings me to the priciest new addition to the brewhouse, the present from my dad: a March Pump.  But you’ll have to wait for more on that one.

Monday, January 7, 2013

Red Poppy

While on a little new family vaca on the coast I got to enjoy my Lost Abbey Red Poppy w/ lunch.  Very nice, tart, light vinegar, fruity, funky, and carbonated.  Made up a little batch of 1.030 starter wort w/ apple juice, water, DME, and yeast nutrient to keep the dregs in.  All the new sterile plastic containers we have gotten free for the baby work great for the small starters and dregs too.

Friday, January 4, 2013

Newest Addition

Sorry for the delays in posting as I have recently welcomed our second son, born 2 weeks early.  Trying to adjust to the new and wonderful life right now so postings will be some what sparse.  Should have an update on new equipment soon as well as a recipe for a double batch of IPA I am planning to brew soon.