
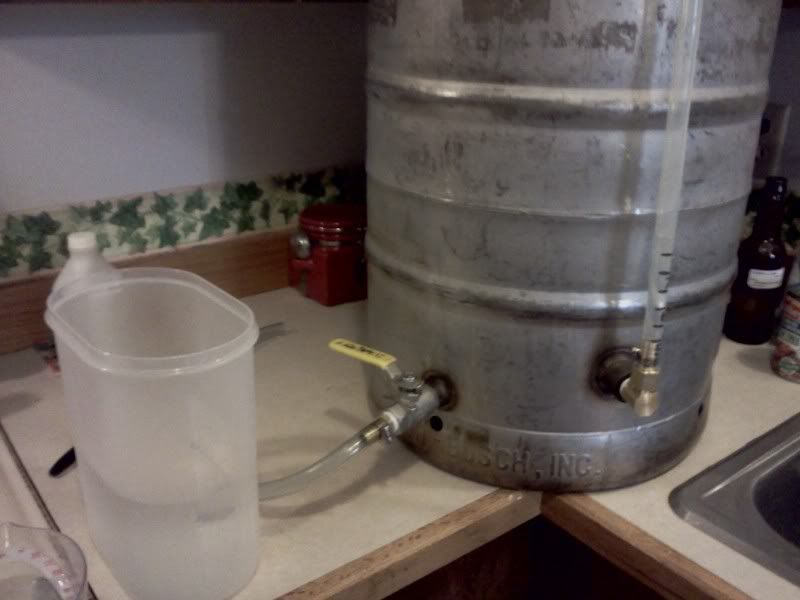
This weekend I fit my keggle (15.5 gal keg converted to use as a kettle) with a few things to make it easier to use. I added a sight glass, and fixed my hop taco and pick-up tube that had failed in a previous brew session. These items were not too difficult to add since the keggle I got from an ex-homebrewer was already fit with a ball valve for draining which was threaded on the inside for easy addition of the pick-up tube, and it was already fitted with a threaded female port that had a hole in it making for a simple sight glass addition.
The most difficult aspects of adding the sight glass were finding the pieces to fit it with and drilling the hole at the top of the keg for the eye-bolt. I was trying to fit this keggle with a sight glass for as cheap as possible. The cheapest way was a nylon 1/2" male thread to 3/8" barb elbow, but that won't work with the boiling wort, so I had to go with brass, which doesn't have such a piece. This lead me to make a piece from two separate pieces, which is still difficult, and more costly. I ended up getting a brass elbow 1/2" male thread to 1/2" male flare, and a 1/2" female flare to 1/2" barb. This made for an easy addition with a little plumbers thread wrap to make the seals water tight (I didn't initially add this and then had to pull it all apart and add it after it leaked). I then added a length of 1/2" high temp vinyl tubing, and attached it through an eye-bolt to a 1/2" barb to 1/2" solder fitting so that it is opened at the top to avoid a vacuum in the sight glass.
 most difficult aspects of adding the sight glass were finding the pieces to fit it with and drilling the hole at the top of the keg for the eye-bolt. I was trying to fit this keggle with a sight glass for as cheap as possible. The cheapest way was a nylon 1/2" male thread to 3/8" barb elbow, but that won't work with the boiling wort, so I had to go with brass, which doesn't have such a piece. This lead me to make a piece from two separate pieces, which is still difficult, and more costly. I ended up getting a brass elbow 1/2" male thread to 1/2" male flare, and a 1/2" female flare to 1/2" barb. This made for an easy addition with a little plumbers thread wrap to make the seals water tight (I didn't initially add this and then had to pull it all apart and add it after it leaked). I then added a length of 1/2" high temp vinyl tubing, and attached it through an eye-bolt to a 1/2" barb to 1/2" solder fitting so that it is opened at the top to avoid a vacuum in the sight glass.
Installing the eye-bolt was a difficult feat. I had numerous sizes of drill bits and planned to step it up as I went. The first, and smallest bit snapped off after making a small dent. The next size up snapped off as well. The next size up was too large to work properly. The second one to snap had broke off at the perfect spot to still fit  into the drill and have 1/4" still showing, so it had no ability to snap again. After about 35 minutes of drilling with this broken bit, and stopping to dump the yeast on the conical for my Brown Ale and add the dry hops while my arms and drill took a rest, I switched out the battery and drilled for another 5 minutes and finally broke through the wall of the keg. Next I stepped it up 3 times. At this point I had one more bit left, my largest one, which was the size I needed to get the eye-bolt through. As I drilled through the keg it ate away at the bit and wore it down as opposed to opening up. I finally got the bit through, and between its work and the kegs work on it, I was able to twist the eye-bolt in and throw away the bit. I pushed the tubing up through the eye-bolt which had a nut on both sides of the keg to keep it in position, and then I pushed the 1/2" barb to solder fitting down into the tubing and through the eye-bolt which made for a very snug fit. Just for good measure I slid a hose clamp up the tubing and attached it under the eye-bolt to ensure proper fitting. I pulled the hose taught, cut it to the proper length to fit on the elbow to hose barb fitting, and then attached it with a hose clamp.
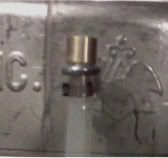 into the drill and have 1/4" still showing, so it had no ability to snap again. After about 35 minutes of drilling with this broken bit, and stopping to dump the yeast on the conical for my Brown Ale and add the dry hops while my arms and drill took a rest, I switched out the battery and drilled for another 5 minutes and finally broke through the wall of the keg. Next I stepped it up 3 times. At this point I had one more bit left, my largest one, which was the size I needed to get the eye-bolt through. As I drilled through the keg it ate away at the bit and wore it down as opposed to opening up. I finally got the bit through, and between its work and the kegs work on it, I was able to twist the eye-bolt in and throw away the bit. I pushed the tubing up through the eye-bolt which had a nut on both sides of the keg to keep it in position, and then I pushed the 1/2" barb to solder fitting down into the tubing and through the eye-bolt which made for a very snug fit. Just for good measure I slid a hose clamp up the tubing and attached it under the eye-bolt to ensure proper fitting. I pulled the hose taught, cut it to the proper length to fit on the elbow to hose barb fitting, and then attached it with a hose clamp.
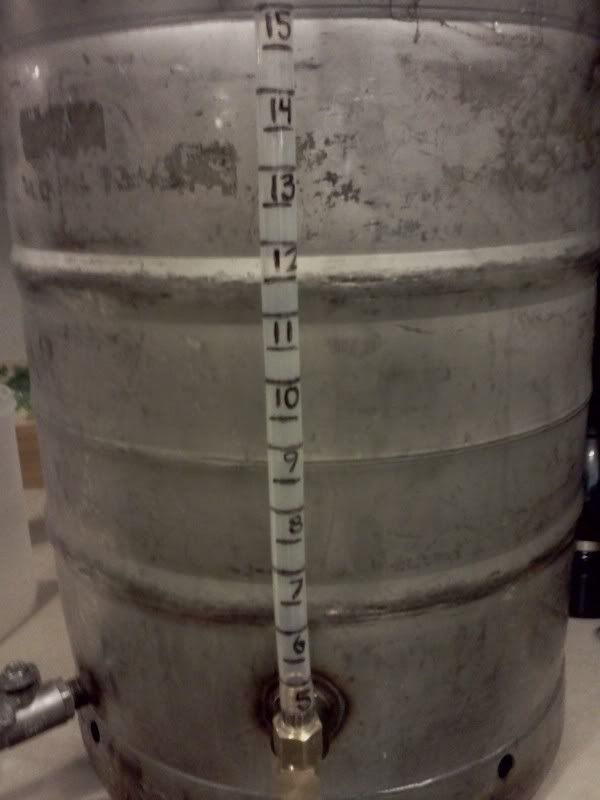 After an over night check for leaks, I calibrated it the next morning. I added a gallon of cold (hot would 1) be a waste of energy, and 2) have a higher volume since hot water is expanded and thus makes for a slightly higher volume) water at a time until it showed inside the tubing. It didn't show until 5 gallons, which will be fine for final volumes, but will not help figure out my first runnings and ensure that I have the correct sparge water, so I will be measuring quart-by-quart up to 5 gallons on a wooden dowel that I have so that I can measure my lower volumes accurately as well. After I reached the first mark, I measured out 1/2 gallon of water at a time and added this to the keggle, marking every full and half gallon on the vinyl tubing, all the way up to 15 gallons.
This sight glass will now let me accurately know how much wort I have collected from the mash, and how much I have post boil and chilling so I know how much I lost to evaporation, and once I move it into the fermenter I will know how much I lost to trub, hops, and keggle dead space (keggle volume minus fermenter volume).
For getting the wort out of the keggle into the fermenter I fit the keggle with a pick-up tube and hop taco. The pick-up tube is a length of 3/8" copper tubing that curves down towards the bottom and through vaccum force will draw all the wort from the keggle through the ball valve into the fermenter. The pick-up tube is attached to a 3/8" female flare to 3/8" compression fitting. This initially screwed onto a 3/8" male thread (into the keggle ball valve) to 3/8" male  flare, but on my Brown Ale it lost its vacuum. The way that it originally was set up didn't work well since it was attached to a hop taco (more to follow on how to make one) which makes it difficult to turn and remove, and if it is not connected perfectly the pick-up tube could be pointing up or side ways instead of down. To fix this issue I added a 3/8" female flare to 3/8" female flare piece that allows the flares to free spin on their own until tight. Now it is fit to the pick-up tube and free spins onto the keggle fitting allowing the pick-up tube and hop taco to stay in the position they should be while I spin the other flare onto the threads and tighten which gives me perfect position and seal, and ease of removal for cleaning.
 flare, but on my Brown Ale it lost its vacuum. The way that it originally was set up didn't work well since it was attached to a hop taco (more to follow on how to make one) which makes it difficult to turn and remove, and if it is not connected perfectly the pick-up tube could be pointing up or side ways instead of down. To fix this issue I added a 3/8" female flare to 3/8" female flare piece that allows the flares to free spin on their own until tight. Now it is fit to the pick-up tube and free spins onto the keggle fitting allowing the pick-up tube and hop taco to stay in the position they should be while I spin the other flare onto the threads and tighten which gives me perfect position and seal, and ease of removal for cleaning.
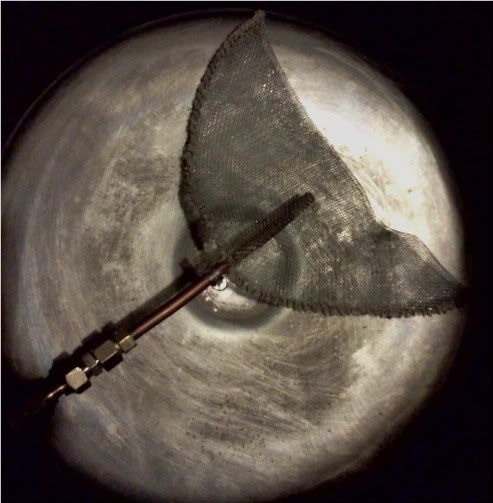 The hop taco is a mesh screen that slides over the end of the pick-up tube to keep hops and even some trub from clogging the tube or going into the fermenter. To make it I bought a stainless steel strainer and removed the mesh from the frame. I then folded this in half and "sewed" it closed using copper wire, stainless steel wire would have worked easier and what was supposed to be used per the instructions from the creators, but I couldn't find any and was in a rush so I used copper. I "threaded" the wire through the mesh and pulled tight using needle nose pliers. I left an opening in the top middle for the pick-up tube to slide inside. I also put a few short pieces of copper wire through this section and left them dangling so I could use a hose clamp to keep the hop taco from sliding off the pick-up tube.
UPDATE 12/3/2012: NEW HOP TACO DESIGN
Wow i can say that this is another great article as expected of this blog.Bookmarked this site..
ReplyDeletefittings manufacturer